
In recent years, artificial intelligence (AI) has revolutionized the way we approach creative processes, and one of the most remarkable advancements in this space is Stable Diffusion. Stable Diffusion is an AI model capable of generating high-quality images from text prompts, unlocking endless possibilities for content creation, design, and much more. It allows users to bring their creative visions to life instantly, offering a tool that is both powerful and accessible. Whether you’re a developer, a designer, a marketer, or simply an AI enthusiast, this “Quick Book” will guide you through understanding Stable Diffusion, its capabilities, and how to leverage it for various use cases. From running the model locally or online to exploring real-world applications, this blog is your comprehensive guide to getting started with Stable Diffusion.
What is Stable Diffusion Artificial Intelligence?
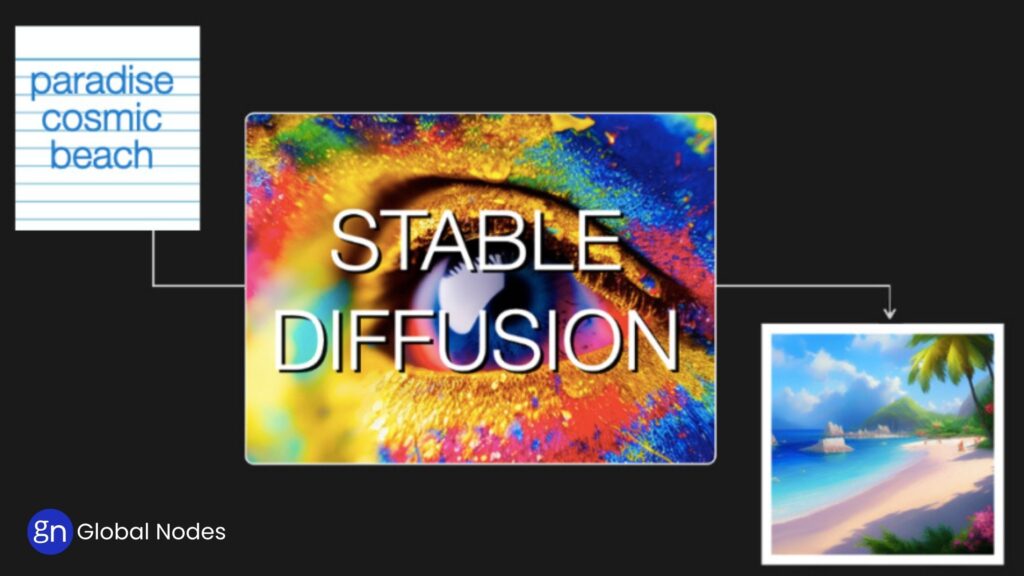
Stable Diffusion is a type of Artificial Intelligence (AI) that creates images based on written text or modifies existing images. It uses machine learning to understand and visualize ideas from human input. Simply put, it can turn your imagination into a picture, just by describing it in words.
This AI model is known for its balance of speed, quality, and flexibility. Unlike some other tools, Stable Diffusion runs on personal computers and can be customized for different creative tasks. Let’s look at the main ways it works:
Text-to-Image Generation
This feature allows you to type a description, and the AI will generate a new image from it. For example, if you write “a sunset over a mountain with a river flowing through,” Stable Diffusion will try to draw exactly that. It’s like telling a painter what you want and having them create it instantly—except the painter is AI. This is widely used for design, storytelling, and digital art.
Image-to-Image Generation
Here, you start with an image and describe how you want it to change. For example, if you have a rough sketch of a character, you can describe their clothes or background, and the AI will enhance or transform the image accordingly. It’s useful when you want to improve or remix existing images rather than start from scratch.
Inpainting
Inpainting is like a smart eraser and painter combined. If part of an image is missing or needs to be changed, Stable Diffusion can fill in the blank or fix the part naturally. For example, if you remove a person from a photo, it can recreate the background so it looks like they were never there. Artists and editors use this to edit images easily without needing advanced tools.
Depth-to-Image
This function understands the depth or distance in a picture—what’s near and what’s far—and uses that information to create better or more realistic versions of the image. It helps the AI draw scenes that make sense in 3D space. This is especially useful in games, animations, or when adding new elements to photos that need to match the perspective.
How Does Stable Diffusion Work?
Stable Diffusion creates images step-by-step by turning random noise into a detailed picture based on your text description. Think of it like watching a blurry image slowly become clear—but with AI doing the painting from scratch.
Here’s a simple breakdown of how it works:
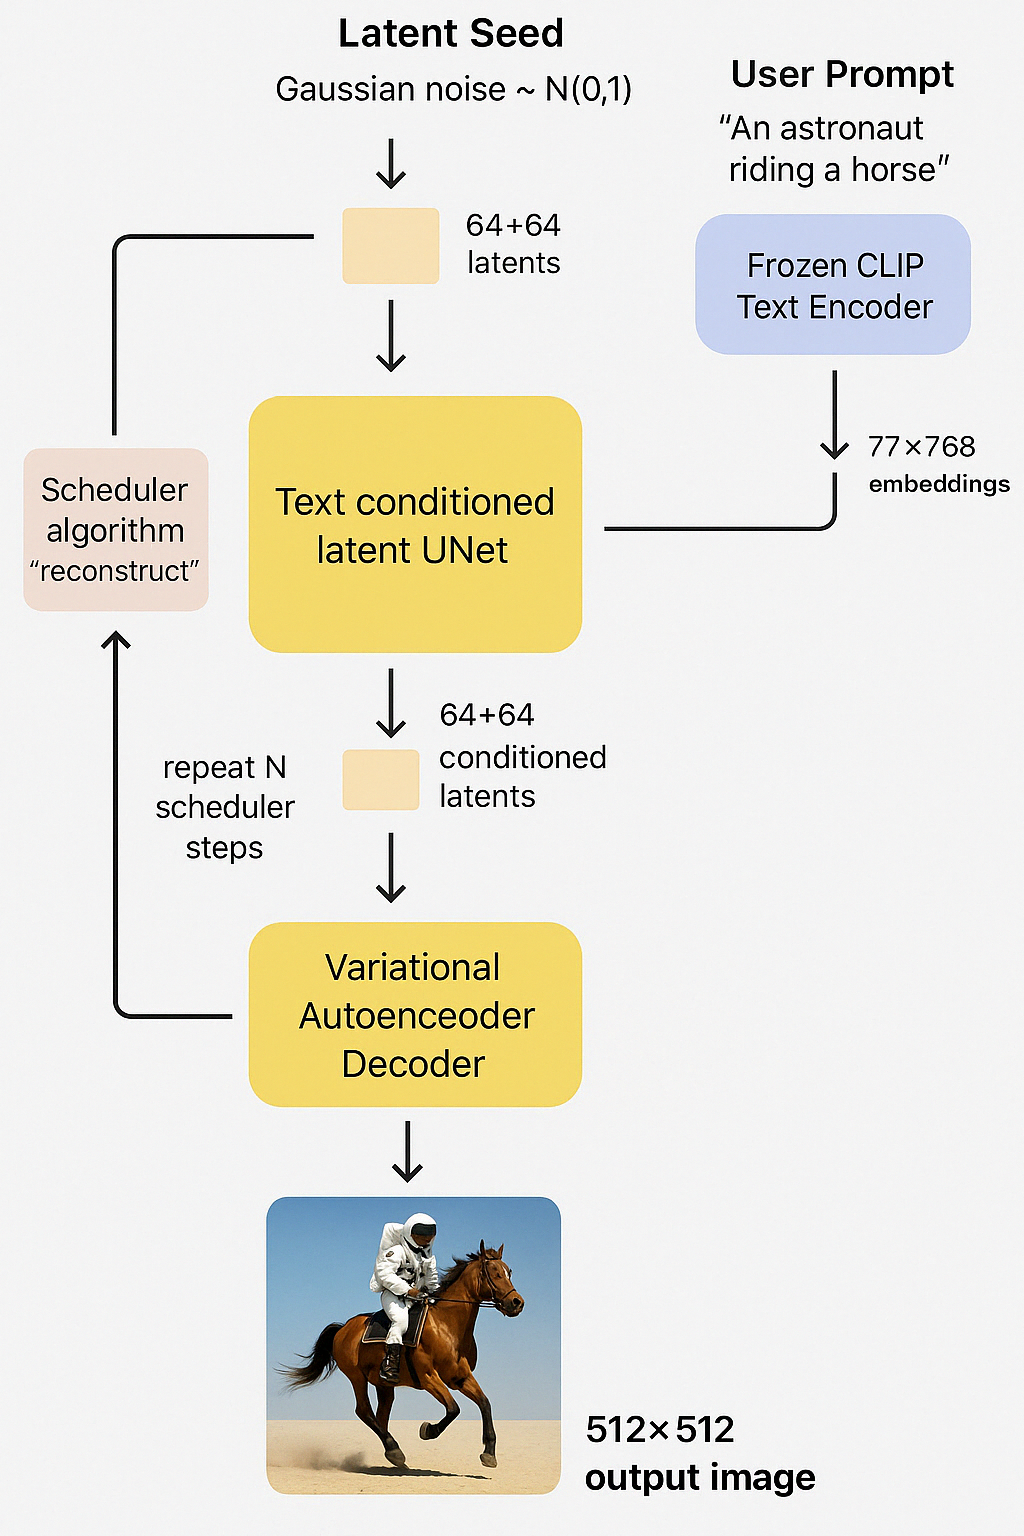
1. Start with Noise (Latent Seed)
The process begins with a completely noisy image—just random dots. This “noise” is like a blank canvas that the AI will reshape. It’s not actually a picture yet, but a starting point filled with randomness.
2. User Prompt and Text Encoder
You type something like “An astronaut riding a horse.” The AI doesn’t just guess what that means. It uses a tool called CLIP Text Encoder to convert your sentence into numbers that describe its meaning in detail. This helps the AI understand what you’re asking for.
3. Text-Conditioned UNet
This is the brain of the system. It takes the noisy image and your text description and starts turning the noise into a picture. It does this in small steps—cleaning up the noise little by little, while shaping it based on your prompt. After each step, the image becomes a bit clearer.
4. Scheduler Algorithm
As the UNet keeps adjusting the image, the scheduler helps guide the process. It’s like a director giving stage directions—telling the AI how much to change in each step until the final image is ready.
5. Decoder – Turning Latents into an Image
Once all the steps are done, the AI now has a high-quality “latent” version of the image. This is a kind of compressed form. The decoder then transforms this into the final image that you can see—usually a 512×512 pixel image.
6. Final Output
The final result is a picture that looks like it was drawn by an artist, but it was made entirely by AI using your words and some clever math.
Why is Stable Diffusion Artificial Intelligence Important?
Stable Diffusion is important because it makes image creation faster, easier, and more accessible than ever before. Here’s why it stands out:
1. Creative Freedom for Everyone
You no longer need to be a professional artist to bring your ideas to life. Whether you’re a student, a designer, or just someone with a creative mind, you can describe a scene in words and let Stable Diffusion turn it into a visual.
2. Saves Time and Money
Creating high-quality visuals used to take hours—or even days—of manual work. With Stable Diffusion, that same image can be made in seconds. This helps businesses, content creators, and designers work faster without relying heavily on expensive design tools or teams.
3. Works Offline and Customizable
Unlike some other tools that require internet or cloud services, Stable Diffusion can run on a personal computer. This means you control your data and can even tweak the model to better suit your needs—whether that’s for a game, marketing visuals, or a custom app.
4. Supports Innovation in Many Fields
From advertising and gaming to education and healthcare, Stable Diffusion is being used in many industries. It helps teams quickly prototype ideas, visualize concepts, or generate training materials. It opens the door to a new kind of productivity powered by AI.
5. Open and Community-Driven
One of the biggest reasons it’s important is because it’s open-source. This means developers and artists around the world are constantly improving it, adding new features, and helping others learn how to use it.
Limitations of Stable Diffusion Artificial Intelligence
While Stable Diffusion is a powerful and exciting tool, it’s not perfect. Like any technology, it has its limits. Understanding these helps you use it better and avoid unrealistic expectations.
1. It Can Misunderstand Prompts
Sometimes, even when you clearly describe something, the image might not match what you had in mind. The AI tries its best to interpret your words, but it doesn’t “understand” language like a human. As a result, details might be missed or shown incorrectly.
2. Struggles with Complex or Abstract Concepts
If your idea is too complicated or very abstract (like “a dream inside a dream underwater”), the AI might not know how to visualize it properly. You may get strange or mixed-up results, and need to try several variations to get it right.
3. Limited by Training Data
Stable Diffusion has learned from a large collection of images available on the internet. If it hasn’t seen enough examples of a specific subject, it may not generate good results. This can be especially noticeable with rare objects or people.
4. Faces and Hands Aren’t Always Accurate
Faces and hands are tricky! Even though the AI tries hard, it often makes mistakes—like extra fingers, awkward hand positions, or distorted facial features. Updates and fine-tuning help, but it’s still a known issue.
5. Ethical and Legal Concerns
Because it can generate images that look real, there’s a risk it could be misused—for example, to create misleading or fake content. Also, since it learns from public images, there are debates around copyright and fair use, especially in commercial projects.
6. Hardware Requirements
Although it can run on a personal computer, it still needs a decent GPU (graphics card) to work smoothly. Without the right hardware, generation can be slow or might not run at all.
Fine-Tuning Methods for Stable Diffusion Artificial Intelligence
Fine-tuning Stable Diffusion means customizing the AI model so it performs better for specific tasks or styles. Whether you’re trying to get better faces, unique art styles, or brand-specific visuals, fine-tuning helps you steer the AI in the direction you want. Here are some popular methods used:
1. Textual Inversion
This method teaches the AI a new concept using just a few example images. For instance, if you want Stable Diffusion to recognize a specific character, logo, or object, you can provide images of it and give it a custom name. Then, you can use that name in your prompts to generate new images with that element.
Use Case: Great for personalizing content with unique items or characters.
2. DreamBooth
DreamBooth goes deeper than Textual Inversion. It uses a small set of images of a specific subject—like a person, product, or pet—and trains the model to understand and recreate it in various poses or settings.
Use Case: Perfect for turning real people or objects into creative, AI-generated scenes.
3. LoRA (Low-Rank Adaptation)
LoRA is a lightweight method that helps adjust specific parts of the model without changing the entire thing. It’s faster to train and requires less computing power, which makes it ideal for users with limited hardware.
Use Case: Useful for small updates, like teaching a new style or improving a specific image type.
4. Hypernetworks
This method involves connecting an extra layer (a small neural network) to the main model. The benefit? You can train these smaller networks on specific tasks or styles, and switch them in and out as needed.
Use Case: Flexible approach when working with different styles or themes without retraining the whole model.
What Architecture Does Stable Diffusion AI Use?
Stable Diffusion uses a smart combination of tools that work together to turn text into images. It’s built with different parts—each doing a special job. Let’s break it down into plain terms:
1. Latent Diffusion Model (LDM)
At the heart of Stable Diffusion is something called a Latent Diffusion Model. Instead of working with full-size images (which can be heavy and slow), it works in a “compressed” version of the image—called the latent space. It makes the process faster without losing much detail.
Think of it like sketching a picture in pencil first, then filling in the colors later. The AI does most of its work in this simplified space, and then turns it into a high-quality image at the end.
2. U-Net
This is the “painter” of the system. U-Net is a neural network that removes noise from the image step-by-step, gradually shaping it into the picture you want. It listens to both the initial noise and your prompt while doing this cleanup.
3. Text Encoder (CLIP by OpenAI)
Stable Diffusion doesn’t just guess what your prompt means—it uses a powerful tool called CLIP to “read” your text. CLIP turns your words into numbers (called embeddings) that the model can understand. These guide the U-Net while it’s creating the image.
4. Variational Autoencoder (VAE)
Once the image is shaped in the hidden (latent) space, the VAE decoder brings it back to the real world—turning the compressed data into a full image you can see and use.
5. Noise Scheduler
This part controls how fast the image becomes clearer. It’s like telling the AI how much noise to remove at each step to get the best result.
How to Write an Inference Pipeline with Diffusers: A Step-by-Step Guide
Step 1: Import Pretrained Models
To get started, we need to import several pretrained models that will be used in our pipeline. We’ll be utilizing the diffusers library to load models for text encoding, image encoding, and noise prediction.
Python,
from transformers import CLIPTextModel, CLIPTokenizer
from diffusers import AutoencoderKL, UNet2DConditionModel, PNDMScheduler

# Load the VAE model for image encoding
vae = AutoencoderKL.from_pretrained("CompVis/stable-diffusion-v1-4", subfolder="vae")

# Load the tokenizer and text encoder from CLIP
tokenizer = CLIPTokenizer.from_pretrained("openai/clip-vit-large-patch14")
text_encoder = CLIPTextModel.from_pretrained("openai/clip-vit-large-patch14")

# Load the UNet model for generating latents
unet = UNet2DConditionModel.from_pretrained("CompVis/stable-diffusion-v1-4", subfolder="unet")
Step 2: Define the Scheduler
Next, we will define a K-LMS scheduler instead of the pre-defined one. The scheduler is an algorithm that generates latent representations from the noisy ones created by the U-Net model.
Python,
from diffusers import LMSDiscreteScheduler

# Initialize the scheduler

scheduler = LMSDiscreteScheduler.from_pretrained("CompVis/stable-diffusion-v1-4", subfolder="scheduler")
Step 3: Define Image Generation Parameters
Now, let’s define the parameters we will use for generating the image, such as the prompt, image dimensions, number of inference steps, and guidance scale.
Python,
prompt = ["an astronaut riding a horse"]

# Image dimensions (default height and width of Stable Diffusion)
height = 512
width = 512

# Number of denoising steps
num_inference_steps = 100

# Classifier-free guidance scale
guidance_scale = 7.5

# Random seed for latent noise generation
generator = torch.manual_seed(32)

# Batch size
batch_size = 1
Step 4: Get Text Embeddings for the Prompt
The next step is to process the text prompt and extract embeddings that will be used by the U-Net model to guide the image generation.
Python,
# Tokenize the prompt and generate text embeddings
text_input = tokenizer(prompt, padding="max_length", max_length=tokenizer.model_max_length, truncation=True, return_tensors="pt")
with torch.no_grad():
text_embeddings = text_encoder(text_input.input_ids.to(torch_device))[0]
Step 5: Obtain Unconditional Embeddings
To perform classifier-free guidance, we need to create unconditional embeddings corresponding to empty text. These embeddings must have the same shape as the conditional text embeddings.
Python,
max_length = text_input.input_ids.shape[-1]

# Create unconditional input (empty text)
uncond_input = tokenizer([""] * batch_size, padding="max_length", max_length=max_length, return_tensors="pt")
with torch.no_grad():
uncond_embeddings = text_encoder(uncond_input.input_ids.to(torch_device))[0]
Step 6: Concatenate Embeddings for Classifier-Free Guidance
Instead of performing two forward passes, we concatenate the unconditional and conditional embeddings into a single batch to streamline the process.
text_embeddings = torch.cat([uncond_embeddings, text_embeddings])
Step 7: Generate Initial Latent Noise
We’ll now generate initial latent noise using the specified batch size and image dimensions.
latents = torch.randn((batch_size, unet.in_channels, height // 8, width // 8), generator=generator)

latents = latents.to(torch_device)
Step 8: Initialize the Scheduler
The scheduler is initialized with the specified number of inference steps. During this initialization, it computes the necessary sigmas and time step values for the denoising process.
scheduler.set_timesteps(num_inference_steps)

# Scale the latents based on the scheduler's noise sigma
latents = latents * scheduler.init_noise_sigma
Step 9: Denoising Loop
We will now run a loop through the timesteps of the scheduler to gradually denoise the image.
from tqdm.auto import tqdm
from torch import autocast
for t in tqdm(scheduler.timesteps):

# Perform classifier-free guidance by expanding the latents
latent_model_input = torch.cat([latents] * 2)
latent_model_input = scheduler.scale_model_input(latent_model_input, t)

# Predict the noise residual using the U-Net model
with torch.no_grad():
noise_pred = unet(latent_model_input, t, encoder_hidden_states=text_embeddings).sample

# Perform guidance
noise_pred_uncond, noise_pred_text = noise_pred.chunk(2)
noise_pred = noise_pred_uncond + guidance_scale * (noise_pred_text - noise_pred_uncond)

# Step the scheduler and update the latents
latents = scheduler.step(noise_pred, t, latents).prev_sample
Step 10: Decode the Latents to an Image
Now that the denoising process is complete, we’ll use the VAE to decode the latents into an image.
# Scale and decode the image latents
latents = 1 / 0.18215 * latents
with torch.no_grad():
image = vae.decode(latents).sample
Step 11: Convert Latents to a Displayable Image
Finally, we’ll convert the generated image into a format that can be displayed or saved.
# Convert the image into a displayable format
image = (image / 2 + 0.5).clamp(0, 1)
image = image.detach().cpu().permute(0, 2, 3, 1).numpy()
images = (image * 255).round().astype("uint8")

# Convert to PIL image
pil_images = [Image.fromarray(image) for image in images]

# Display the image
pil_images[0]
How to Run Stable Diffusion Artificial Intelligence Locally
Running Stable Diffusion locally allows you to have complete control over the image generation process while also benefiting from faster results and privacy. Unlike online platforms, where you rely on external servers, running the model on your own computer gives you the freedom to generate as many images as you want without worrying about usage limits or subscription fees. This section will guide you through the process of setting up Stable Diffusion locally on your machine.
1. Check Your System Requirements
Before setting up Stable Diffusion locally, you’ll need to ensure that your computer meets the necessary system requirements. These include having a good GPU for faster image generation and enough RAM for efficient processing.
- Operating System: Stable Diffusion can run on Windows, macOS, and Linux. Ensure you have an up-to-date version of one of these systems.
- GPU: A CUDA-compatible GPU is recommended for the best performance (NVIDIA GPUs are preferred). Having at least 6GB of VRAM will help with generating images more efficiently.
- RAM: A minimum of 16GB of RAM is recommended, especially if you plan to generate high-resolution images.
2. Install Required Software
To run Stable Diffusion locally, you will need to install a few pieces of software, including Python and the necessary libraries.
- Python: Stable Diffusion requires Python to run. Download and install the latest version of Python from the official website (Python 3.8+).
- CUDA Toolkit: If you’re using an NVIDIA GPU, you’ll need to install the CUDA toolkit for hardware acceleration. This will ensure that Stable Diffusion can use your GPU efficiently.
- Git: Git is required to clone the necessary repositories from GitHub. Download and install Git from the official website.
3. Clone the Stable Diffusion Repository
The next step is to clone the official Stable Diffusion repository, which contains all the necessary code to run the model locally.
- Open a terminal (or Command Prompt on Windows) and run the following command:
git clone https://github.com/CompVis/stable-diffusion.git
This will download the repository to your local machine.
4. Set Up a Virtual Environment (Recommended)
Setting up a virtual environment is a good practice as it keeps your dependencies isolated from other projects on your machine.
- Open a terminal or Command Prompt and navigate to the folder where you cloned the repository.
- Run the following commands to create and activate a virtual environment:
# Create a virtual environment
python -m venv venv

# Activate the virtual environment

# For Windows

venv\Scripts\activate

# For macOS/Linux

source venv/bin/activate
5. Install Dependencies
Stable Diffusion requires several Python libraries to run smoothly. To install the required dependencies, navigate to the stable-diffusion directory (if you’re not already there) and run:
pip install -r requirements.txt
This command will install all the necessary libraries, including PyTorch, Transformers, and other tools required for Stable Diffusion.
6. Download Pretrained Models
Stable Diffusion requires pretrained models to generate images. These models are available from sources like Hugging Face or directly from Stability AI. To download the models:
- Visit the Hugging Face website or the model’s official source and download the necessary files (e.g., the VAE, UNet, and tokenizer files).
- Place these model files in the appropriate directories as outlined in the repository’s instructions.
7. Run Stable Diffusion Locally
With everything set up, you’re now ready to run Stable Diffusion on your machine. Use the following commands to start generating images:
- Start the Script: Run the Python script to start generating images:
python scripts/txt2img.py --prompt "A beautiful landscape" --plms --n_samples 1 --n_iter 1 --seed 42 --scale 7.5
Here’s what each part of the command does:
- –prompt “A beautiful landscape”: The text description for the image you want to generate.
- –plms: Uses the PLMS (Laplacian Pyramid Sampling) method for inference.
- –n_samples 1: Number of images to generate in one run.
- –n_iter 1: Number of iterations for generating the image.
- –seed 42: A seed for randomization, ensuring reproducible results.
- –scale 7.5: Adjusts how strongly the model follows your prompt. Higher values will stick closer to the prompt.
Wait for Image Generation: The script will generate the image based on your prompt. Depending on your system’s performance, it may take a few seconds to a few minutes.
8. View and Save the Generated Image
Once the image is generated, you can find it in the output directory specified in the command. The image will typically be saved as a PNG file. You can open it with any image viewer or save it to your computer.
9. Troubleshooting Common Issues
Running Stable Diffusion locally might come with some challenges, especially if you’re new to AI models. Here are a few common issues and how to solve them:
- Out of Memory (OOM) Errors: If your GPU runs out of memory, try reducing the image resolution or the number of inference steps.
- Missing Dependencies: Ensure you have installed all dependencies listed in the requirements.txt file. You may also need to install additional packages like torch or transformers manually if they’re not included.
- CUDA Issues: If you’re not using an NVIDIA GPU, you may need to install the CPU version of PyTorch instead of the CUDA version.
How GlobalNodes Can Help with Stable Diffusion Artificial Intelligence
GlobalNodes can significantly enhance your experience with Stable Diffusion by offering advanced hosting, scaling, and optimization solutions tailored to AI workloads. Whether you’re a developer looking to deploy Stable Diffusion models or an organization aiming to integrate AI-powered image generation into your services, GlobalNodes provides the infrastructure and expertise needed to run and scale Stable Diffusion models efficiently.
Here’s how GlobalNodes can support you with Stable Diffusion:
1. Optimized Cloud Hosting for AI Workloads
GlobalNodes specializes in providing robust cloud infrastructure that ensures your Stable Diffusion models run smoothly, even with high demand or large datasets. With powerful GPU instances, you can run resource-intensive models like Stable Diffusion with ease, eliminating the need for dedicated on-premise hardware. This means faster image generation, reduced wait times, and the ability to scale according to your project’s requirements.
2. Auto-Scaling and Performance Optimization
One of the major benefits of using GlobalNodes is auto-scaling. As the demand for image generation increases, GlobalNodes automatically scales your resources, ensuring that performance stays optimal without you needing to manually adjust the server settings. This is especially valuable for businesses that require high-throughput AI image generation for use cases like content creation, advertising, or product design.
3. Customizable AI Deployment Solutions
GlobalNodes provides customizable solutions to fit the specific needs of your organization. Whether you’re looking to fine-tune Stable Diffusion models for unique applications or deploy pre-trained models for a quick start, GlobalNodes offers the flexibility to tailor your AI environment. This helps businesses save time and resources while leveraging the power of AI to drive innovation.
4. Secure Data Storage and Privacy
When dealing with sensitive data, GlobalNodes ensures the highest levels of security. Whether you’re working with proprietary content or customer data, GlobalNodes provides encrypted storage solutions and strict compliance with data privacy regulations. This makes it a trustworthy choice for industries such as healthcare, finance, and media, where confidentiality is paramount.
5. Expert Support and Consultation
GlobalNodes offers expert consultation services to help you integrate Stable Diffusion into your workflow, ensuring you’re utilizing the model to its fullest potential. From setup and configuration to performance tuning and troubleshooting, GlobalNodes’ AI experts guide you through every step to ensure a seamless experience.
Use Cases of Stable Diffusion AI
Stable Diffusion’s capabilities can be leveraged across a wide variety of industries, transforming how businesses and creators generate visual content. Here are some common use cases where Stable Diffusion AI can make an impact:
1. Content Creation for Marketing and Advertising
Marketing teams can use Stable Diffusion to generate high-quality images tailored to specific campaigns. Whether it’s creating social media visuals, banner ads, or promotional materials, Stable Diffusion allows marketers to rapidly prototype and create stunning visuals based on text prompts. This significantly reduces the time and cost associated with traditional image creation or stock image licensing.
2. Personalized Artwork and Custom Designs
Artists and designers can use Stable Diffusion to explore creative possibilities and generate custom artwork based on their specific visions. Whether it’s digital art, concept designs, or illustrations for various media, Stable Diffusion empowers creators to experiment with limitless design ideas quickly. This is especially valuable for industries like entertainment, publishing, and gaming.
3. Product Design and Prototyping
For product designers, Stable Diffusion can be used to generate visual prototypes and concept images of new products. The ability to input detailed prompts and visualize designs in a matter of minutes accelerates the design and approval process. This is ideal for industries such as fashion, industrial design, and consumer electronics.
4. Virtual Environments for Gaming and VR
Stable Diffusion can be used to create backgrounds, textures, and even entire virtual environments for use in video games or virtual reality (VR) experiences. Game developers can generate rich, immersive worlds and assets with minimal resources, reducing the need for extensive manual artwork creation while maintaining high visual quality.
5. Educational and Training Materials
In the education sector, Stable Diffusion can be used to create visually engaging educational materials, such as diagrams, illustrations, or infographics. This can enhance the learning experience for students and educators alike, as they can generate custom visuals tailored to their specific subject matter.
6. Automated Visual Content Generation for E-Commerce
E-commerce platforms can take advantage of Stable Diffusion to create product images, promotional visuals, and even customized product mockups without requiring photographers or graphic designers. This is especially useful for businesses with large catalogs that need to generate high-quality images at scale.
7. AI-Driven Storyboarding for Film and Animation
For filmmakers and animators, Stable Diffusion can be used to generate concept art and storyboards based on narrative prompts. This accelerates the pre-production phase and helps visualize scenes, characters, and environments before the actual filming or animation process begins.
8. Healthcare Imaging and Medical Visualization
In the medical field, Stable Diffusion can assist with generating high-quality visualizations for educational materials or medical simulations. For example, it can be used to create detailed anatomical diagrams, surgical procedure visuals, or even assist in generating 3D models for medical imaging.
9. Interior Design and Architecture Visualization
Architects and interior designers can leverage Stable Diffusion to create realistic renderings of their design concepts. Instead of relying on expensive 3D modeling software, designers can quickly generate visual representations of architectural designs, helping clients visualize the finished product before any physical work begins.
10. Social Media Content Creation
Social media influencers and content creators can use Stable Diffusion to generate personalized images for their posts. Whether it’s creating unique backgrounds, themed visuals, or stylized portraits, the model can be tailored to fit specific aesthetics, making it a great tool for anyone looking to stand out in the crowded social media space.
Conclusion
Stable Diffusion represents a significant leap forward in the field of artificial intelligence, offering incredible potential for transforming creative workflows across various industries. By harnessing its power, businesses and individuals can generate unique, high-quality visuals effortlessly, sparking innovation and enhancing productivity. Whether you choose to run Stable Diffusion online or locally, the flexibility and accessibility it provides make it an invaluable tool for anyone looking to explore the world of AI-generated imagery. As the technology continues to evolve, the possibilities for its application are boundless, and staying informed about the latest developments will allow you to take full advantage of what Stable Diffusion has to offer.